Upgrading from Windows 7 to Windows 8 in a VMWare Virtual Machine
1st November 2012Though my main home PC runs Linux Mint, I do like to have the facility to use Windows software from time to time and virtualisation has allowed me to continue doing that. For a good while, it was a Windows 7 guest within a VirtualBox virtual machine and, before that, one running Windows XP fulfilled the same role. However, it did feel as if things were running slower in VirtualBox than once might have been the case and I jumped ship to VMware Player. It may be proprietary and closed source but it is free of charge and has been doing what was needed. A subsequent recent upgrade of video driver on the host operating system allowed the enabling of a better graphical environment in the Windows 7 guest.
Instability
However, there were issues with stability and I lost the ability to flit from the VM window to the Linux desktop at will with the system freezing on me and needing a reboot. Working in Windows 7 using full screen mode avoided this but it did feel as I was constrained to working in a Windows machine whenever I did so. The graphics performance was imperfect too with screening refreshing being very blocky with some momentary scrambling whenever I opened the Start menu. Others would not have been as patient with that as I was though there was the matter of an expensive Photoshop licence to be guarded too.
In hindsight, a bit of pruning could have helped. An example would have been driver housekeeping in the form of removing VirtualBox Guest Additions because they could have been conflicting with their VMware counterparts. For some reason, those thoughts entered my mind and I was pondering another more expensive option instead.
Considering NAS & Windows/Linux Networking
That would have taken the form of setting aside a PC for running Windows 7 and having a NAS for sharing files between it and my Linux system. In fact, I did get to exploring what a four bay QNAP TS-412 would offer me and realised that you cannot put normal desktop hard drives into devices like that. For a while, it looked as if it would be a matter of getting drives bundled with the device or acquiring enterprise grade disks so as to main the required continuity of operation. The final edition of PC Plus highlighted another one though: the Western Digital Red range. These are part way been desktop and enterprise classifications and have been developed in association with NAS makers too.
Looking at the NAS option certainly became an education but it has exited any sort of wish list that I have. After all, there is the cost of such a setup and it’s enough to get me asking if I really need such a thing. The purchase of a Netgear FS 605 ethernet switch would have helped incorporate it but there has been no trouble sorting alternative uses for it since it bumps up the number of networked devices that I can have, never a bad capability to have. As I was to find, there was a less expensive alternative that became sufficient for my needs.
In-situ Windows 8 Upgrade
Microsoft have been making available evaluation copies of Windows 8 Enterprise that last for 90 days before expiring. One is in my hands has been running faultlessly in a VMware virtual machine for the past few weeks. That made me wonder if upgrading from Windows 7 to Windows 8 help with my main Windows VM problems. Being a curious risk-taking type I decided to answer the question for myself using the £24.99 Windows Pro upgrade offer that Microsoft have been running for those not needing a disk up front; they need to pay £49.99 but you can get one afterwards for an extra £12.99 and £3.49 postage if you wish, a slightly cheaper option. There also was a time cost in that it occupied a lot of a weekend on me but it seems to have done what was needed so it was worth the outlay.
Given the element of risk, Photoshop was deactivated to be on the safe side. That wasn’t the only pre-upgrade action that was needed because the Windows 8 Pro 32-bit upgrade needs at least 16 GB before it will proceed. Of course, there was the matter of downloading the installer from the Microsoft website too. This took care of system evaluation and paying for the software as well as the actual upgrade itself.
The installation took a few hours with virtual machine reboots along the way. Naturally, the licence key was needed too as well as the selection of a few options though there weren’t many of these. Being able to carry over settings from the pre-exisiting Windows 7 instance certainly helped with this and with making the process smoother too. No software needed reinstatement and it doesn’t feel as if the system has forgotten very much at all, a successful outcome.
Post-upgrade Actions
Just because I had a working Windows 8 instance didn’t mean that there wasn’t more to be done. In fact, it was the post-upgrade sorting that took up more time than the actual installation. For one thing, my digital mapping software wouldn’t work without .Net Framework 3.5 and turning on the operating system feature form the Control Panel fell over at the point where it was being downloaded from the Microsoft Update website. Even removing Avira Internet Security after updating it to the latest version had no effect and it was a finding during the Windows 8 system evaluation process. The solution was to mount the Windows 8 Enterprise ISO installation image that I had and issue the following command from a command prompt running with administrative privileges (it’s all one line though that’s wrapped here):
dism.exe /online /enable-feature /featurename:NetFX3 /Source:d:\sources\sxs /LimitAccess
For sake of assurance regarding compatibility, Avira has been replaced with Trend Micro Titanium Internet Security. The Avira licence won’t go to waste since I have another another home in mind for it. Removing Avira without crashing Windows 8 proved impossible though and necessitating booting Windows 8 into Safe Mode. Because of much faster startup times, that cannot be achieved with a key press at the appropriate moment because the time window is too short now. One solution is to set the Safe Boot tickbox in the Boot tab of Msconfig (or System Configuration as it otherwise calls itself) before the machine is restarted. There may be others but this was the one that I used. With Avira removed, clearing the same setting and rebooting restored normal service.
Dealing with a Dual Personality
One observer has stated that Windows 8 gives you two operating systems for the price of one: the one in the Start screen and the one on the desktop. Having got to wanting to work with one at a time, I decided to make some adjustments. Adding Classic Shell got me back a Start menu and I left out the Windows Explorer (or File Explorer as it is known in Windows 8) and Internet Explorer components. Though Classic Shell will present a desktop like what we have been getting from Windows 7 by sweeping the Start screen out of the way for you, I found that this wasn’t quick enough for my liking so I added Skip Metro Suite to do this and it seemed to do that a little faster. The tool does more than sweeping the Start screen out of the way but I have switched off these functions. Classic Shell also has been configured so the Start screen can be accessed with a press of Windows key but you can have it as you wish. It has updated too so that boot into the desktop should be faster now. As for me, I’ll leave things as they are for now. Even the possibility of using Windows’ own functionality to go directly to the traditional desktop will be left untested while things are left to settle. Tinkering can need a break.
Outcome
After all that effort, I now have a seemingly more stable Windows virtual machine running Windows 8. Flitting between it and other Linux desktop applications has not caused a system freeze so far and that was the result that I wanted. There now is no need to consider having separate Windows and Linux PC’s with a NAS for sharing files between them so that option is well off my wish-list. There are better uses for my money.
Not everyone has had my experience though because I saw a report that one user failed to update a physical machine to Windows 8 and installed Ubuntu instead; they were a Linux user anyway even if they used Fedora more than Ubuntu. It is possible to roll back from Windows 8 to the previous version of Windows because there is a windows.old directory left primarily for that purpose. However, that may not help you if you have a partially operating system that doesn’t allow you to do just that. In time, I’ll remove it using the Disk Clean-up utility by asking it to remove previous Windows installations or running File Explorer with administrator privileges. Somehow, the former approach sounds the safer.
What About Installing Afresh?
While there was a time when I went solely for upgrades when moving from one version of Windows to the next, the annoyance of the process got to me. If I had known that installing the upgrade twice onto a computer with a clean disk would suffice, it would have saved me a lot. Staring from Windows 95 (from the days when you got a full installation disk with a PC and not the rescue media that we get now) and moving through a sequence of successors not only was time consuming but it also revealed the limitations of the first in the series when it came to supporting more recent hardware. It was enough to have me buying the full retailed editions of Windows XP and Windows 7 when they were released; the latter got downloaded directly from Microsoft. These were retail versions that you could move from one computer to another but Windows 8 will not be like that. In fact, you will need to get its System Builder edition from a reseller and that can only be used on one machine. It is the merging of the former retail and OEM product offerings.
What I have been reading is that the market for full retail versions of Windows was not a big one anyway. However, it was how I used to work as you have read above and it does give you a fresh system. Most probably get Windows with a new PC and don’t go building them from scratch like I have done for more than a decade. Maybe the System Builder version would apply to me anyway and it appears to be intended for virtual machine use as well as on physical ones. More care will be needed with those licences by the looks of things and I wonder what needs not to be changed so as not to invalidate a licence. After all, making a mistake might cost between £75 and £120 depending on the edition.
Final Thoughts
So far Windows 8 is treating me well and I have managed to bend to my will too, always a good thing to be able to say. In time, it might be that a System Builder copy could need buying yet but I’ll leave well alone for now. Though I needed new security software, the upgrade still saved me money over a hardware solution to my home computing needs and I have a backup disk on order from Microsoft too. That I have had to spend some time settling things was a means of learning new things for me but others may not be so patient and, with Windows 7 working well enough for most, you have to ask if it’s only curious folk like me who are taking the plunge. Still, the dramatic change has re-energised the PC world in an era when smartphones and tablets have made so much of the running recently. That too is no bad thing because an unchanging technology is one that dies and there are times when big changes are needed, as much as they upset some folk. For Microsoft, this looks like one of them and it’ll be interesting to see where things go from here for PC technology.
Pondering storage options
1st June 2011The combination of curiosity and a little spare time had me browsing online computing technology stores recently. A spot of CD and DVD burning brought on by a flurry of Linux distribution testing reminded me of the possibility. Because I have built up a sizeable library of digital photos, ensuring that I have backups of them is something that needs doing. A 2 GB Samsung external hard drive is brought to life every now and again for that purpose but the prospect of using Blu-Ray discs has appealed to me. After all capacities of 25 GB for single layer discs and 50 GB for dual layer ones sound not inappropriate for my purposes. However, they aren’t a cheap option at the time of writing with each disc costing in the region of £3-4 at one place where I was looking. The cost of BD writers themselves seems not to be so bad though with a few in the £60-100 bracket; any lower than this and you could end up with a combo drive that reads Blu-Ray discs and writes to DVD’s and CD’s so a modicum of concentration is needed. As attractive as the idea might be, the cost of BD media means that I’ll wait a little while before deciding to take the plunge. The price premium at the moment is a reminder of the way that things used to be when CD and DVD writers first came on the market. It is very telling when discs come packaged in jewel cases, something that you won’t see too often with CD’s or DVD’s.
Another piece of storage excitement that hasn’t escaped me is the advent of SSD hard drives. With no moving parts like in conventional hard drives, they bring a speed boost. Concerns about their lifetimes and the numbers of read/write events per drive would stall me when it comes to storing personal data on them but using them for the likes of operating system files sounds attractive, especially with my partiality to Linux perhaps not hammering drives so much. As with any new technology, there is a price premium though a drive big enough for hosting an operating system can be acquired for less than £100. As with many of my hardware purchase brainwaves, there’s no rush but this is an option that I’ll keep at the back of my mind.
Another appealing notion is the idea of getting a NAS so that files can be shared between a few computers. While I have seen prices starting at just above £70 for single disk enclosures, these generally are a more expensive option than external drives and that’s before you consider the cost of any hard drives. Nevertheless, the advantages of a unit containing more than a single hard drive while operating as a print server for any compatible printer too. When you get to 4 or 5 hard drive trays, then the cost has mounted but that could be when they pay their way too. What reminded me of these was a bookazine on home networking that I recently found at a branch of WHSmith’s and their attractions are subject to the networking side of things being made to work without a drama. Once that’s out of the way, then their usefulness really does appeal.
Mulling over all these brainwaves is one thing but it doesn’t mean that the purse strings will become too loose in this age of economic constraint. In fact, pondering them may serve to staunch any impulse purchases. Sometimes, a spot of virtual shopping serves to control things rather than losing the run of oneself.
Snap Preview… removed
1st February 2007Snap Preview has been removed from this blog with immediate effect after seeing a blog post by Nick Wilson decrying it from a user perspective. I can accept that it is intrusive but I have to admit that I still find it something of a novelty. However, visitor annoyance easily overrides any appeal that such a widget may hold for me and it has had to go.
Amateur Photographer reviews…
19th July 2007Amateur Photographer seem to have had a run of reviews recently. First off were the Olympus E-410 and E-510 that they seemed to like. Then, they moved onto the Ricoh Caplio GX100 and they seemed to like that too, though they did say that quality wasn’t up to SLR standards. But then again, it is a compact and that might be expecting a bit too much. This week, Paint Shop Pro comes under the spotlight as does Epson’s V350 scanner. I have yet to read these but I have been engaging in a spot of equipment acquisition anyway. My CanoScan 5000F scanner has been usurped by Epson’s Perfection Photo 4490 and very happy I am with it too. The quality of the scans that I have been doing of prints has been good and the presence of an on/off switch is a creditable one. None of the other scanners that I have had possessed it and having to plug something in and out from the power socket is inconvenient to say the least. I have also gone and got myself a new DSLR. Seeing Pentax’s K10D going with a 18-55 mm lens for £499 at Jessop’s overrode my better reason and put paid to ideas of purchasing any other electronic goods for the rest of this year. It’s an award-winning gadget and Photography Monthly’s Will Cheung seemed to get on fine with it. Which Digital Camera said it was heavy but it has to stand up to use in the great outdoors. The sensor may be a 10 megapixel affair so this will be an upgrade to my Canon EOS 10D; that has a sensor in need of clean right now (I plan to get it done by the professionals) and every time that I want to use an image that it has made, Photoshop’s healing brush has to be pressed into service. Pentax does boast about all of the seals that it has added to the K10D, a good thing if they cut down on the dust entering the camera. And if dust does get in, the sensor cleaning feature will hopefully see it off from the photos. Image stabilisation, another value adding feature, is also there and may prove interesting. Strangely, there’s some motion picture capture as well and I hope that it doesn’t get the EU coming after me to collect retrospective camcorder duty. In any case, it’s not a feature that I really need and the Live View functions on the equivalent Olympus offerings fall into the same category anyway. It’ll be interesting to see how the K10D performs and it’s a change from the Canon/Nikon hegemony that seems to dominate digital photography these days.

Update: I have since perused the current issue of Amateur Photographer and seen that Paint Shop Pro suffered from performance issues on computers that worked fine with Photoshop. Otherwise, it compared well with Adobe’s offerings even if the interface wasn’t seen to be as slick. Epson’s V350 was well received though it was apparent that spending more got you a better scanner but that’s always the way with these things.
Dealing with an “Your insider preview build settings need attention” message in Windows 10 Settings
5th September 2016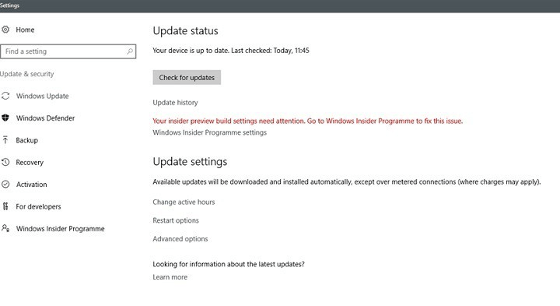
Having now upgraded all my Windows 10 machines to the Anniversary Update edition without much in the way of upheaval, I came across the following message on one of them:
Your insider preview build settings need attention. Go to Windows Insider Programme to fix this.
It appeared on the Update screen of the Settings application and I believe that I may have triggered it by letting foolish curiosity take me to the Windows Insider Programme screen. Returning there offered no way of resolving the issue so I had to try the registry editing tip that I discovered elsewhere on the web. Naturally, the creation of a System Restore Point before proceeding with changes to the Windows Registry is advised.
Typing REGEDIT into Cortana brings up a clickable link to the Registry Editor. Having clicked on this, I then clicked on the Yes button on the ensuing dialogue box that Windows 10 throws up every time you make a system change such as installing new software. With the Registry Editor opened, I made my way to the following location:
HKEY_LOCAL_MACHINE\SOFTWARE\Microsoft\WindowsSelfHost\UI\Strings
Once there, I deleted every entry that mentioned “Insider” or “Windows Insider” to leave only two afterwards: "(Default)", "UnknownErrorDialogValues". That resolved the issue and I now intend to stay away from the Windows Insider Programme screen in Settings so that the message never appears again.
More thoughts on Windows 10
11th August 2015Now that I have left Windows 8.x behind me and there are a number of my machines running Windows 10, I have decided to revisit my impressions of the operating system. The first Technical Preview was something that I installed in a virtual machine and I have been keeping an eye on things have developed since then and intend to retain a Windows Insider installation to see what might be heading our way as Windows 10 evolves as now expected.
After elaborating on the all important upgrade process earlier, I am now moving onto other topics. The Start Menu is a big item but there are others as you will see below.
Start Menu
Let’s start with an admission: the prototype Start Menu that we got in the initial Windows 10 Technical Preview was more to my liking. Unpinning all the tiles allowed the menu to collapse back to the sort of width that anyone familiar with Windows 7 would have liked. If there was a setting to expunge all tiles at once and produce this state, I would have been well happy.
It was latter that we got to learn that Microsoft was not about consign the Windows 8 Modern interface entirely to history as many would have wanted. Some elements remain with us such as a Start Menu with a mandatory area for tiles and the ability to have it display full screen. Some are live but this can be turned off on a tile by tile basis and unneeded ones can be removed altogether. It is even possible to uninstall most apps by right clicking on a tile or other Start Menu entry and select the required option from the resulting context menu. For others, there is a command line alternative that uses Powershell to do removals. After this pruning, things were left in such a state that I have not been moved to restore Classic Shell so far.
The Start Menu settings used be in the same place as those for the taskbar but they are found in the new Settings tool. Some are in the Personalisation section and it has its own Start subsection for setting full screen mode or highlighting of new apps among other things. The equivalent Colours subsection is where you find other settings like assigning background colours based on those in a desktop background image, which itself is assigned in it own subsection in the Personalisation area.
Virtual Desktops
Initially, I failed to see the point in how Microsoft implemented these and favoured Virtuawin instead. My main complaint was the taskbar showed buttons for all open apps regardless of the screen in which they are opened. However, that was changed so your taskbar shows different buttons for each virtual desktop, just like the way that Linux and UNIX do things. Switching between desktops may not be as smooth of those yet but the default setting is a move in the right direction and you can change it if you want.
Cortana
This was presented to the world as a voice operated personal assistant like Apple’s Siri but I cannot say that I am keen on such things so I decided to work as I usually do instead. Keyboard interaction works fine and I have neutered things to leave off web searches on Bing to use the thing much in the same way as the search box on the Windows 7 Start Menu. It may be able to do more than that but I am more than happy to keep my workflow unchanged for now. Cortana’s settings are available via its pop-up menu. Collapsing the search box to an icon to save space for your pinned and open applications is available from the Search section of the taskbar context menu (right clicking the taskbar produces this).
Settings
In Windows 8.x, the Control Panel was not the only area for settings but remained feature complete but the same is not the case for Windows 10 where the new Settings panel is starting to take over from it. The two co-exist for now but it seems clear that Settings is where everything is headed.
The Personalisation section of the tool has been mentioned in relation to the Start Menu but there are plenty of others. For instance, the Privacy one is one that definitely needs reviewing and I found myself changing a lot of the default settings in there. Naturally, there are some other sections in Settings that need hardly any attention from most of us and these include Ease of access (accessibility), Time & language, Devices and Network & Internet. The System section has a few settings like tablet mode that may need review and the Update & security one has backup and recovery subsections that may be of interest. The latter of these is where you find the tools for refreshing the state of the system following instability or returning to a previous Windows version (7 or 8.x) within thirty days of the upgrade.
Tidying dynamic URL’s
15th June 2007A few years back, I came across a very nice article discussing how you would make a dynamic URL more palatable to a search engine and I made good use of its content for my online photo gallery. The premise was that URL’s that look like that below are no help to search engines indexing a website. Though this is received wisdom in some quarters, it doesn’t seem to have done much to stall the rise of WordPress as a blogging platform.
http://www.mywebsite.com/serversidescript.php?id=394
That said, WordPress does offer a friendlier URL display option too and you can see this in use on this blog; they look a little like the example URL that you see below, and the approach is equally valid for both Perl and PHP. I have been using the same approach for the Perl scripts powering my online phone gallery and now want to apply the same thinking to a gallery written in PHP:
http://www.mywebsite.com/serversidescript.pl/id/394
The way that both expressions work is that a web server will chop pieces from a URL until it reaches a physical file. For a query URL, the extra information after the question mark is retained in its QUERY_STRING variable while extraneous directory path information is passed in the variable PATH_INFO. For both Perl and PHP, these are extracted from the entries in an array; for Perl, this array is called is $ENV and $_SERVER is the PHP equivalent. Thus, $ENV{QUERY_STRING} and $_SERVER{‘QUERY_STRING’} traps what comes after the “?” while $ENV{PATH_INFO} and $_SERVER{‘PATH_INFO’} picks up the extra information following the file name (the “/id/394/” in the example). From there on, the usual rules apply regarding cleaning of any input but changing from one to another should be too arduous.
The wonders of mod_rewrite
24th June 2007When I wrote about tidying dynamic URL’s a little while back, I had no inkling that that would be a second part to the tale. My discovery of mod_rewrite, an Apache module that facilitates URL translation. The effect is that one URL is presented to the user in the browser address bar, and the exact same URL is also seen by search engines, while another is passed to the server for processing. It might sound like subterfuge but it works very well once you manage to get it set up properly. The web host for my hillwalking blog/photo gallery has everything configured such it is ready to go but the same did not apply to the offline Apache 2.2.x server that I have going on my own Windows XP box. There were two parts to getting it working there:
- Activating mod-rewrite on the server: this is as easy as uncommenting a line in the httpd.conf file for the site (the line in question is: LoadModule rewrite_module modules/mod_rewrite.so).
- Ensuring that the .htaccess file in the root of the web server directory is active. You need to set the values of the AllowOverride directives for the server root and CGI directories to All so that .htaccess is active. Not doing it for the latter will result in the an error beginning with the following: Options FollowSymLinks or SymLinksIfOwnerMatch is off which implies that RewriteRule directive is forbidden. Having Allow from All set for the required directories is another option to consider when you see errors like that.
Once you have got the above sorted, adding this line to .htaccess: RewriteEngine On. Preceding it with an Options directive to ensure that FollowSymLinks and SymLinksIfOwnerMatch are switched on does no harm at all and may even be needed to get things running. That done, you can set about putting mod_write to work with lines like this:
RewriteRule ^pages/(.*)/?$ pages.php?query=$1
The effect of this is to take http://www.website.com/pages/input and convert it into a form for action by the server; in this case, that is http://www.website.com/pages.php?query=input. Anything contained by a bracket is assigned to the value of a system-named variable. If you have several bracketed sections, they are assigned to sequentially numbered variables as follows: $1 for the first, $2 for the second and so on. It’s all good stuff when you get it going and not only does it make things look much neater but it also possesses an advantage when it comes to future-proofing too. Web addresses can be kept constant over time, even if things change behind the scenes. It means that returning visitors will find what they saw the last time that they visited and surely must ensure good karma in eyes of those all important search engines.
Adding a new domain or subdomain to an SSL certificate using Certbot
11th June 2019On checking the Site Health page of a WordPress blog, I saw errors that pointed to a problem with its SSL set up. The www subdomain was not included in the site’s certificate and was causing PHP errors as a result though they had no major effect on what visitors saw. Still, it was best to get rid of them so I needed to update the certificate as needed. Execution of a command like the following did the job:
sudo certbot --expand -d existing.com,www.example.com
Using a Let’s Encrypt certificate meant that I could use the certbot command since that already was installed on the server. The --expand and -d switches ensured that the listed domains were added to the certificate to sort out the observed problem. In the above, a dummy domain name is used but this was replaced by the real one to produce the desired effect and make things as they should have been.
Using .htaccess to control hotlinking
10th October 2020There are times when blogs cease to exist and the only place to find the content is on the Wayback Machine. Even then, it is in danger of being lost completely. One such example is the subject of this post.
Though this website makes use of the facilities of Cloudflare for various functions that include the blocking of image hotlinking, the same outcome can be achieved using .htaccess files on Apache web servers. It may work on Nginx to a point too but there are other configuration files that ought to be updated instead of using a .htaccess when some frown upon the approach. In any case, the lines that need adding to .htaccess are listed below though the web address needs to include your own domain in place of the dummy example provided:
RewriteEngine on
 RewriteCond %{HTTP_REFERER} !^$
 RewriteCond %{HTTP_REFERER} !^http://(www\.)?yourdomain.com(/)?.*$ [NC]
 RewriteRule .*\.(gif|jpe?g|png|bmp)$ [F,NC]
The first line turns on the mod_rewrite engine and you may have that done anyway. Of course, the module needs enabling in your Apache configuration for this to work and you have to be allowed to perform the required action as well. This means changing the Apache configuration files. The next pair of lines look at the HTTP referer strings and the third one only allows images to be served from your own web domain and not others. To add more, you need to copy the third line and change the web address accordingly. Any new lines need to precede the last line that defines the file extensions that are to be blocked to other web addresses.
 RewriteEngine on
 RewriteCond %{HTTP_REFERER} !^$
 RewriteCond %{HTTP_REFERER} !^http://(www\.)?yourdomain.com(/)?.*$ [NC]
 RewriteRule \.(gif|jpe?g|png|bmp)$ /images/image.gif [L,NC]
Another variant of the previous code involves changing the last line to display a default image showing others what is happening. That may not reduce the bandwidth usage as much as complete blocking but it may be useful for telling others what is happening.